Mobile Usability Testing: The Hart Method
This week I'd like to share my process of setting up a full 360º mobile usability testing lab. I will talk about details of the equipment used, the step by step process and will show a short clip of showing the lab in action. I understand there are probably numerous ways to execute this type of testing but I'd like to show you my method.
What you need:
- Somewhere to set up the lab
- A solid/stable internet connection.
- Mac or PC Laptop
- Mobile Device - Currently, lab works only for IOS - Looking for Android solution!
- Reflector ($12.99) [Link]
- Quicktime (Or any screen recording software
- Ipevo Document Camera [Link]
- Microphone (Internal/cam/External)
- A second Webcam - (Logitech or similar) [Link]
- Multi-port USB hub [Link]
- Starbuck Gift cards - (For the participants' expertise)
- "Testing Area” Printed paper
- Tape
How to set it up:
So here is a typical set up of the mobile testing lab

1 - First things first, you need to make sure you have your power cord plugged into your laptop. I know I'm stating the obvious here but I have seen situations in the past where people have been rushing round trying to find a chord before the laptop runs out of battery.
I usually start with setting up reflector and making sure the screen mirroring works. That is generally a simple process and once you have the mobile screen mirrored then it should be stable (Based on your wifi connection). I then open the Ipevo and quicktime player software.
Now that reflector is working and the programs are open, I set aside the phone and continue with setting up the rest of the lab.
2- I then plug in the usb hub. This is useful as the laptop only has 2 ports and with this lab you need a few more for chargers and the secondary cam.
3- Now that the usb hub is powered up, I plug in the secondary cam. Then go to quicktime and go to file/new movie recording and choose the camera from the drop down to the right of the record button on the screen. Once selected the view from the camera should show up. Don't worry about getting the camera angles correct just yet. I tend to save that till the end. I'm just focusing on getting the technology working.
4- The next step is to plug in the ipevo camera to the other main usb port on the laptop.. However, not only do you need to set up the camera but you need to tape down the testing zone (Number 2 in the image below). This is helpful for when participants' hands move out of view, you can simply ask them to try and keep within the 'testing area'. I feel this is somewhat of a limitation as we want the user to be as comfortable as possible. But for now I feel this this the best solution. Once the testing area is in place then it should be relatively easy to angle the ipevo camera into place.
5- It's important that a phone charger is at hand. I usually charge the phone between tests if possible. The charger is plugged into the usb hub.
When you are happy with the setup and you are ready to go, you navigate to file/new screen recording and highlight the area of the screen you want to record and click the start recording button. When you are finished with the test you can right click on the application icon in the dock.
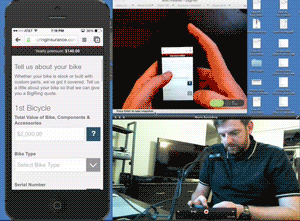
The image below shows the screen set up and the view from the moderator.

1- This is a typical view from the ipevo document camera. This is great for capturing the hand gestures and how the users hold the phone.
2- The view from the secondary camera captures the behaviors and emotions of the participant
3- The reflector mirroring is great because the moderator can see what the user is doing and is able to keep the test flowing smoothly if the phone gets scewed from the participant. This way we are able to capture a full 360º view of the participant simultaneously.
Here are some of the pros and cons of this mobile testing lab:
Pros
- Users can naturally hold the phone
- Have the ability to capture multiple angles, gestures and behaviors in real time
- This can be set up anywhere
- Quick to set up (5-10 minutes)
- Recruit your own participants
- Researcher can see what is happening on the device so the tasks can flow nicely
- Supports IOS and Android devices
Cons
- Have to rely on a solid internet connection for reflector functionality
- Screen recording can take up a lot of memory if using quicktime player for internal use suck as guerrilla testing
This method has been very effective for mobile testing. Although, it’s not perfect, we have been able to execute anytime and the results have been extremely powerful especially when analyzing and showcasing to stakeholders and colleagues. Below, is a short clip of the initial setup in action to give you an idea of how it works.
Final thoughts
I'd love to improve this setup as I'm sure there are even better ways of doing this on a budget for remote testing. Hearing your thoughts and experiences would be greatly appreciated. In addition I'd love to get the ball rolling on a solution for Android devices also but I'm unaware of mirroring software as good as Reflector.
Thanks for reading!